06 February 2014

Baked Grapefruit

I'll be honest, I've never been particularly fond of grapefruit; but for some reason my dad thought I'd enjoy one [actually four] so I have four grapefruits lying around.

I saw something a few weeks ago on Facebook [or pinterest? who knows] about baked grapefruits with brown sugar and maple syrup [I think?] so I decided the best thing to do with these grapefruits was try something that had actually sounded like it could be good if I liked grapefruits.

Well; guess what? I LOVE GRAPEFRUITS! when they're baked this way...

Ingredients:
1 whole grapefruit [halved]
5 tbsp. honey
1 tbsp. brown sugar
2 tbsp. granulated white sugar
1 tsp. cinnamon
1/4 c. plain yogurt


Directions:
1. preheat oven to 350F. cut grapefruit in half and remove core. with a knife cut along each of the piths [the thin sort of stringy pieces that case the pieces individually]

2. fill the center [where you removed the core] with honey [2tbsp], drizzle any extra around the top. Sprinkle [1/2 tbsp.] brown sugar, [1 tbsp.] sugar and [1/2 tsp.] cinnamon on the top.

3. repeat step 2 on the other half of the grapefruit. place both on regular tin-foil lined baking sheet and bake for 15 minutes.

4. remove from oven, drizzle [1 tbsp.] honey on top of the grapefruit pieces [1/2 tbsp. each], sprinkle with extra brown sugar, sugar or cinnamon if desired.

5. cut between the fruit and the rind in a full circle to help pull the individual pieces out. you can either leave them in the whole grapefruit, move them to a bowl; I take them all out to let the extra juice out and  put them back in the rind, it makes it decorative and festive.

6. enjoy!
I also happen to dislike plain yogurt but for some reason had this as well, I mixed a little under 1/4 c. of it in with the pieces and it was DELICIOUS!

04 February 2014

100 Love Letters Project

100 Love Letters Project is a project where we write love letters to strangers and place them in random places to be found by said strangers.

When: 14th, February, 2014

Where: Everywhere, Earth

Why: To spread positivity by spreading love, hope and inspiration to people we don't even know and my never meet!

How: Write your love letter[s] and place them in whatever locations you choose: library, school, work, the park, a store, etc.

Some tips:
  • Don't write who you are, leave in anonymous!
  • Make it positive and upbeat; what would you want to read in a random letter written to you?
  • Make it stand out; a special color, ink, drawings, etc. Something that will grab a persons attention. Maybe write something like "Hi Stranger" or "Yes, this is for you!". 
Find the event & join in on

03 February 2014

morning coffee & childrens stories

       As like any other mother, I find my children amazing; but this morning
was particularly perfect. My boys were at school already which left just Izzy and I. I made us coffee and "coffee" [which is actually a whole lotta milk, a dash of sugar and a touch of coffee] but anyhow; the snow was falling just slightly with the morning light leaking in our windows as as we drank our coffees. Izzy had my colored pens and was drawing and I was checking my messages such. 
       I looked over to find her 'writing a story', however much a person her age can write. I'll admit it was a lot of scribbles, loops and lines between [and around] the lines of your standard writing paper.
       I asked her what she was doing and she said "I'm writing a story", which in it's own made my heart swell a little ❤ but what struck me was when I asked her what it was about she actually had a story line and description of what she was 'writing' so in a sense, despite the fact it may not have been actually written on paper, in her head she truly was writing a story.
       Maybe it's just me, maybe it's because I'm her mama, maybe it's a lot of things combined; but all three of my children have picked up some type of art.
My oldest son: drawing & photography
My middle son: photography & cooking/culinary
My daughter: baking, writing & painting
       I personally think it's important that children experiment with arts and learning to find their niche with it if they enjoy it. Both as an interest and an  outlet.  I've seen their  improvement grow within it, I've seen their creativity unfold and their imagination spark.
And I find it amazing every time.

14 January 2014

artist's block - break it!

    The recurring question “how do I break this artist's block”, we’ve all hit that wall where we just can’t find a way to get anything out, and if we do it’s just rubbish we can hardly bare to admit we created. There are many causes of artist’s block, and luckily many cures!


     Sometimes we're not inspired, this is probably the hardest to overcome because you can't always just make yourself get up and go get inspired. Another reason people hit this block is because they're just bored with what they're doing. Below are a few ways to break either of those causes, use one method, use four whatever you want and whatever it takes. You can get through it.

  • Take a break; seriously. This is my first suggestion give yourself a little bit to think, relax, rejuvenate and simply be blocked for a minute, hour or a day or two. Unless you’re in some rush to get it done take advantage of this step. Sometimes your brain just needs a minute to cool down before it powers back up and gets going again.
  • Prompts: prompts come in many forms from themes, words/phrases, examples, visual pieces, music etc. They are used to inspire you and make you think about how to represent or respond to the given prompt. [you can google [art type i.e. writing, photography, etc.] prompts or you can use your own.
  • Try something new: Think of something you haven’t done/tried before. Then go forth and find a tutorial and give it a try, you’ll create something from that tutorial AND maybe you’ll get inspired to use the method/style in a different way with something else.
  • Previous Ideas/Art:
    • in my opinion everybody should keep an inspiration journal [writing journal, thought journal, whatever you choose to call it]. We’ve all had those moments where we’re in class, at work, walking our dog, showering, whatever and we have a brilliant idea! Write it down, write it on your hand, write it in the steam on the mirror, write it on a scrap of paper just write it down. And when you get the chance add it to your journal [I do recommend keeping this on you, but it’s up to you. I also know people who keep their ideas in their phone notes because it’s easier to carry your phone then remember a journal] When you get a block, go back to this list and find stuff on there to start, work on or whatever.
    • another option is to go back to an old piece of work; think of the ways you improve it and do again, branch off [start a series, make it bigger or even get an entirely new idea!]
  • Start a project: Project 365, 52 week project, a monthly themed challenge [NaNoWriMo, 30 Days of Photos, 30 days, 30 sketches], even make one up! Make a goal/challenge to get yourself creating something, anything. It doesn’t have to be fantastic, it has to break that barrier between you and your inspiration. 
  • Believe in yourself: if you believe you're never going to create art again, you're probably not. If you keep thinking it's only going to suck, it probably will. Believe in  yourself and your art! Take compliments! Let your head grow! Improve, grow and strive. You'll get through this block, we all have 

SUMMARY 
   ☆ Take a break
   ☆ Give prompts a go [music, words/phrases, visual, etc.]
   ☆ Try new methods/styles/techniques/etc.
   ☆ Go back to old ideas/art and try them [again]
   ☆ Start a project [daily, weekly, month long, etc.]
   ☆ Believe in Yourself

*** This is an older article I had written on deviantART in 2010, while updating my old posts/journals/articles, I decided to share some of them here. Maybe you'll find them useful as well ♥ ***

10 January 2014

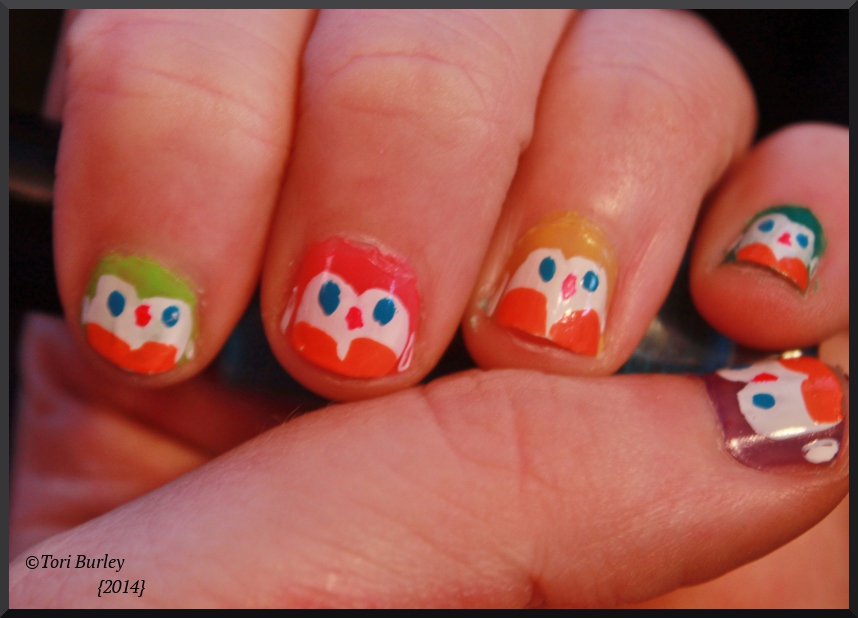
Penguin Nails

       I really have nothing special to say about them, other than they're pretty freaking awesome! *dances*

08 January 2014

Watermelon Cupcakes

Watermelon Cupcakes
Ingredients
1 pkg. regular white cake mix
1 pkg. cherry kool-aid
1/2 c. mini-chocolate chips
1 c. white frosting [store bought or home made]
red & green food coloring

Directions
1. Mix cake mix as directed. Add in cherry kool-aid and a few drops of red food coloring as desired. Gently add in mini-chocolate chips.
2. Put into cupcake tins, filling about 3/4 of the way to the top
3. Bake as directed by the cake mix
4. Allow to cool. Meanwhile, take mix green food dye into frosting until desired shade[s] of green.
5. Frost cupcakes when cooled.
6. [optional] Sprinkle extra mini-chocolate chips on top after frosted OR mix in when mixing frosting

***this is NOT an original recipe***

07 January 2014

Jello Cookies

Jello Cookies
Ingredients 
3.5 c. flour
1 tsp. baking powder
1.5 c. salted butter, softened
1 c. sugar
1 egg
1 tsp. vanilla
4 (3 oz.) pkg. jello (any flavors)
food coloring

Directions
1. beat butter in large bowl with mixer until creamy. add sugar and beat until light and fluffy. blend in egg and vanilla.
2. in separate bowl mix flour and baking powder. gradually beat flour mixture into butter mix.
3.  divide dough into 4 sections. sprinkle 2 tbsp. of jello into each section. knead together. add a few drops of food coloring to make dough more vibrant
4. shape dough into 1 inch balls. roll in extra jello from the packets. place, 2 inches apart on baking sheets. flatten with bottom of bowl.
5. bake 8-10 minutes at 350 on lines baking sheets. cool on backing sheets 2 minutes then remove to wire racks to cool completely.

***this is NOT an original recipe, it can be found on numerous sites online***